
The purpose of writing content for a website is usually for SEO (Search Engine Optimisation) purposes, which is to attract traffic to the website, more viewers, which in turn could lead to increased sales and push up our position in google. Our main business is organising boat tours between Coron and El Nido in Palawan. Each page created on our website automatically has links to this service. The aim is to create useful pages about traveling in the Philippines, and one easy way to accomplish this is to write a page for every single interesting place to visit in the country. I have started this myself for Visayas and a few other places in the country. I use a wordpress multisite, which means I can choose different themes for different subsites/sections, as I have for the different regions of the country. I have to assign you as a Contributing User to each subsite you want to add an article/page to.
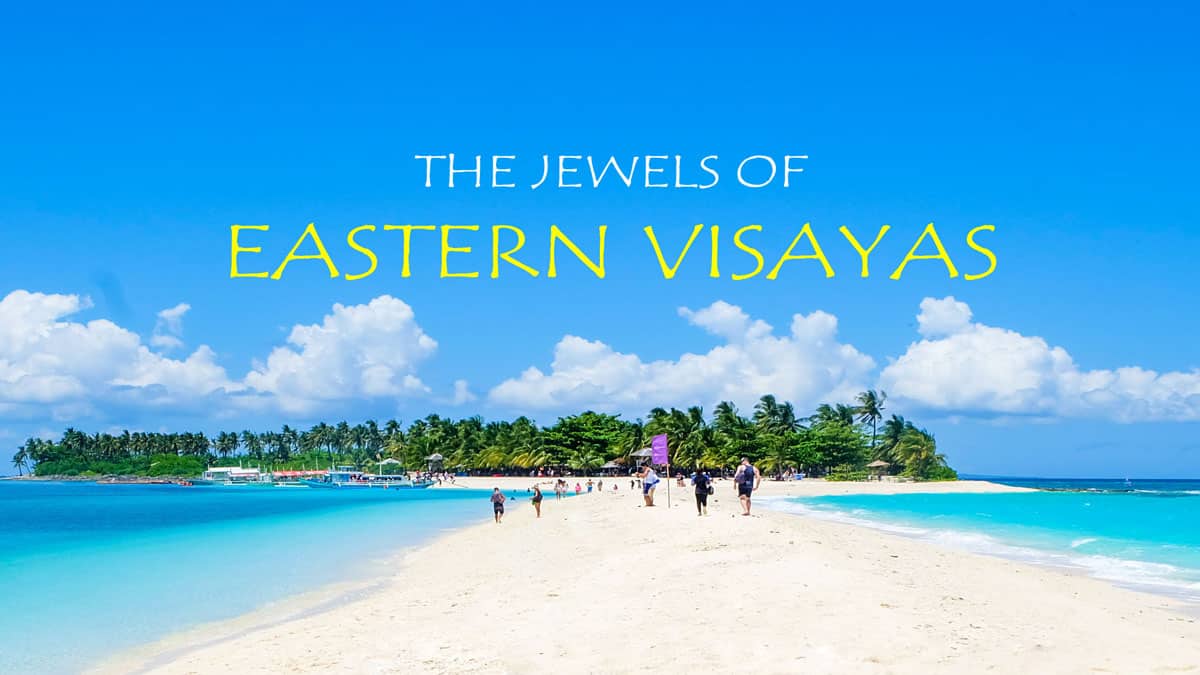
This Visayas page happens to have our highest traffic and you will notice there is a sort of table of contents at the top. This is accomplished with a certain wordpress plugin which can create such a list using tags and categories. I have labelled the tag as “Genre” in this case, but when you write an article for a certain place, it is important to tag it properly, always using existing tags (unless you come up with a new, useful genre – consult with me first please), making sure not to misspell it. When one clicks on a genre link, they will be taken to an automatically generated page listing all the special places with that same tag. Every place can have multiple tags. For example, it can be a waterfall with a white sands beach. I find this an easy way to categorise the entire country by regions. I would like to make my site a major go-to site for travelers coming to the Philippines, with a wealth of useful information.
Eventually I would like to travel to all the places with my family, document them and add our own experience and suggestions to each page. In the meantime we must do it by searching the internet to look for information on each interesting place to visit, and rewrite it into our own words. Together with downloading and editing pictures and preparing the entire page, I found this entire process would take roughly 5-6 hours, depending on how much interesting material I was able to find for that particular place or subject. Without any research, such as writing about some concept straight from my head, the time spent would obviously generally be shorter.
When I said “rewrite into our own words”, keep in mind I use copyscape.com to check if you have not copy/pasted directly from other websites. Google checks this as well and penalises a website for such practices (plagiarism). So what I usually do is I surf the net looking for material on a certain place, copy/pasting snippets or useful paragraphs etc. into a text/Word file. I write the article offline for greater speed, and also to take advantage of the spell checker. Once I have downloaded as much content as possible (if you come across any good pictures along the way, now could be a good time to save it to your computer for later uploading (after potentially editing it quickly – will explain this simple process later)), I will begin to formulate the page.
One important aspect of a successful page is to use Headings. The title of the page is generally Heading 1 (H1) and automatic. After that you can use H2 to divide the article into sections, and if an H2 section will have useful subsections, you can use H3 etc. Other times I might use H4 and higher to create special formatting, such as for quotations (ie- green text, bold, italicised, centered). This makes it easy to quickly format a paragraph into a commonly used form and make the entire website more consistent.
You want to have the most interesting and useful content at the top of your article, saving the bottom for the least interesting stuff. Always imagine what would be the most interesting for a traveler wanting to come to the country. Useful and interesting content about the place at the top. Your first few sentences should be an eye catcher and engage the reader to want to read more. In terms of what google (G) displays as a snippet in the page results (the description under the title and link), it can either be the first few sentences, or something that G grabs from the page, or you can state it yourself in the snippets section of the SEO plugin we have installed (found under the content of the page when in editing mode). I find this latter choice is the most preferable. I do this process last, after completing the page, and try to think of a snippet which will capture the attention of someone surfing the internet looking for information on the Philippines. It should be like a marketing jingle and make the viewer curious to read more, in essence to follow the link to read your page. Speaking of which, to further entice you to put your heart and soul into each article you write, I can offer you a commission on all future sales of our service, since I have a plugin which keeps track of the entry page to our site and all our pages visited before using the contact form. I use this plugin for our affiliate program (links from other websites to ours). Hopefully they will open up the country’s borders sooner than later so that we can get back into business. Your commission can be juicy indeed 🙂
One reason you break up your article into H2 sections is for readability, but also for SEO. People are developing a shorter attention span these days, with all the distractions, so it is good to keep things on a paragraph by paragraph basis, perhaps every 2-3 paragraphs separated by a picture, occasional a heading break. People do not want to get bored with a long, drawn out thesis, but “content is king”, as they say in the SEO community, so the more text the better. Which is why you put the more boring stuff later in the article. It is not important that the reader reads the entire article but that they are gradually guided, along the way, perhaps through some other of our pages, eventually to our main service page. That is the final intention, to make a sale. Although in the future we could offer other services in the country. It is therefore possible, during your research of the country, to come across interesting services we could sell. For this I can give you a commission as well, so we’d have to discuss that if you do find something you could sell.
But back to the H2 section breaks, in SEO it is important to try to squeeze in the important keywords into these headings. In our case it would be the site itself. Or perhaps you might write an article “The best white sand beaches in the Philippines”. In this case you might try to squeeze in “white sands” into a lot of the H2 titles. I will read the article after you and give you tips along the way, there is a keyword section in the SEO plugin (which I will probably upgrade to a Pro version), and I am constantly learning about SEO as well.
Take it online!
Now that you have created your article offline, we are ready to take it online. Already you may have created your various H2 etc. sections offline. After proofreading your work offline and using your spellcheck tools, simply copy/paste it into wordpress.
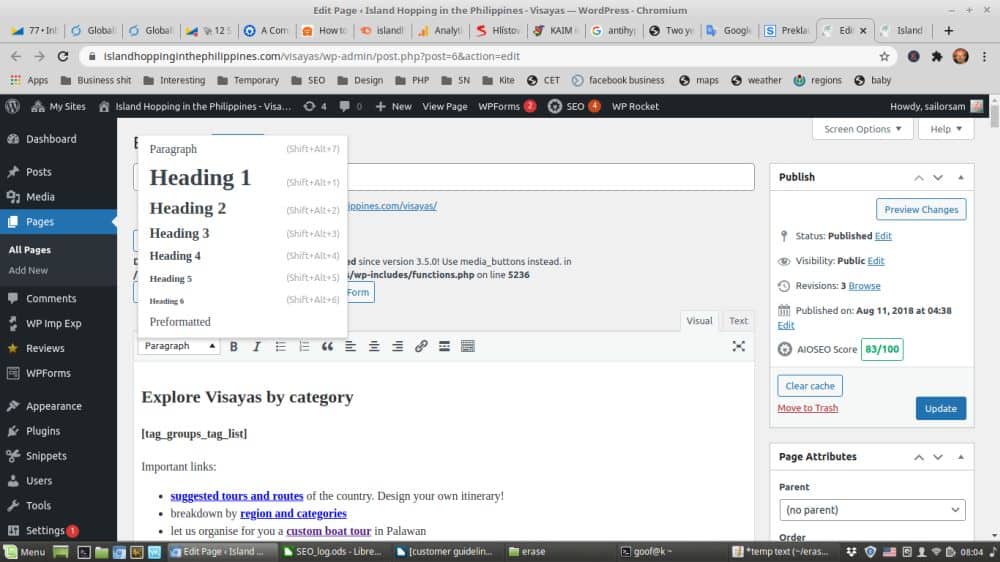
Let us take our Visayas page as an example. Let’s say you want to write a new page for a certain interesting place to visit in Visayas that we have NOT yet written a page for (if you find new information for a certain place, it is always best to add that to an existing page, if we have one, to keep things neatly organised. G also likes it when pages are updated occasionally). I am in editing mode, since this Visayas page has already been created, and here is a screenshot:

When creating, make sure you are creating a POST and not a Page!!
First, give it a useful and captivating title. Just to the right of centre you will see a Visual (usually the default) and Text tab. Make sure you are pasting in your offline article text in the default Visual mode (this easily made bold by selecting the text and pressing B on your formatting strip). In the centre right where I have an Update button, you will probably have Publish on your end. Go ahead and press that to activate the page. It will reload into Edit mode. Under the title you can see the Permalink (the address of the webpage). Right click on that with your mouse and choose “Open in new tab”. You should now have the Editing page open in one tab, with the final output visible in another tab. Note the black strip along the top, just underneath the browser tabs. This is only visible to you because you are logged into wordpress.
Now you are ready to start editing. First, make sure that your paragraph breaks have copied properly from your offline version. They should show up as automatic, single spaces between each paragraph. Check out your output tab to make sure it looks right. If not, you may need to copy the text into another text editor and copy out of that into WP (wordpress). Now press the Update button to see if the output looks better (F5 is usually a shortcut key for Refresh Webpage).
Now, if your paragraphs are nicely separated, you can proceed to scroll through the text and put your cursor (click in with your left mouse button) into the individual headings, after which simply change the style by clicking on the Paragraph icon on the extreme left of your formatting strip just above the text of your article.
Once you have classified all your headings, Update the page and go to your output tab in your browser to check if all looks okay.
Putting in pictures
As you can see I am also using headings for this page, with pictures, to give you an example how to make a page pleasant to read by having little breaks. Sometimes I’ll add headings after I’ve added pictures, just to break up the page more and make it more readable. More content is good, but keep the more boring stuff at the bottom, and along the way you can incorporate into your text a little sales plug for our main service. Basically like taking the hand of a customer who walks into a store and eventually leading them to the cash register. That is our end purpose.
Once you want to insert your pictures, I find it best to do this in Text mode (the tab just to the right of the Visual tab you are presently in). This will show you the raw html text, but I find it much faster to work in than the Visual mode, which also displays the pictures you are inserting. It might depend on your internet connection as well, but you do have these two options to play with.
Go to your output tab and start reading your article. After the second paragraph you might feel it would be appropriate to put in a certain picture. Perhaps even at the top of your article. Either pick one from the pictures you downloaded while writing the article, or go to G images or whatever and find an appropriate image to compliment your article. Remember, you want to make the reading experience informative and captivating, and subtly lead your customer by the hand to the next step, which is towards the cash register.
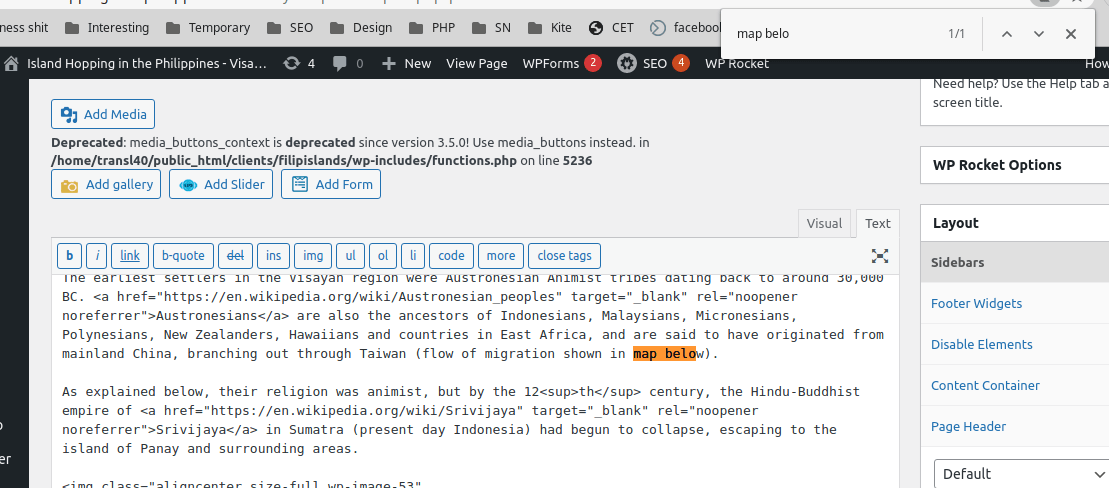
Put your cursor at the end of the paragraph after which you want to insert your image. This should work both in Visual and Text mode. For our Visayas page, lets say I wanted to insert a picture below the first paragraph after the History of Visayas H2 title. I clicked with my left mouse into the body of the text, pressed ctrl+f for the find/search box, started typing in “map below”, which took me to the text in question, as shown in this screenshot:
In Text mode WP will correct things such as double spaces etc later. For now, create a space under the paragraph or put your cursor in an existing space between the paragraphs and press the Add Media button near the top left of the screen. But FIRST!…
Editing your images
Page speed is very important for G, so it is important to use good quality pictures that are not unnecessarily large. For a full page width I find about 1000 pixels should be a good size. For this I use a free Windows program IrfanView, otherwise you are free to use whatever editor you like. I will explain this one simply because I find it super fast to work with.
If you select a section of the picture with your mouse, you can press ctrl+y to crop it. ctrl+s to save it. ctrl+r is for resizing. Pressing ENTER puts it in full screen mode, if you like.
Resize your image
As you can see, I used H3 for this subsection to make things easier to read and organised. Press ctrl+r to resize, which should give you something like:
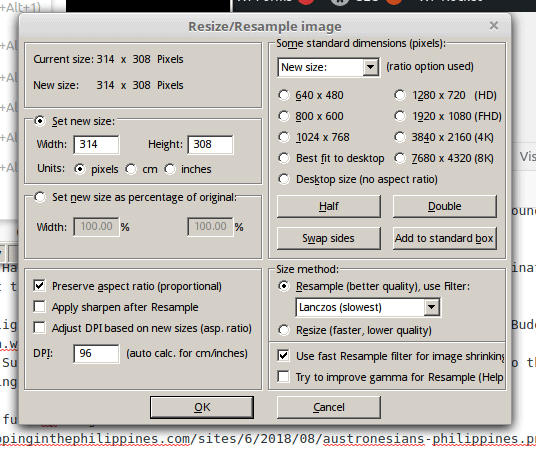
Unless you want to change the dimensions, make sure “Preserve aspect ratio” is selected. Now, in the upper left you can go to the Set New Size section and choose a different value for the Width. By changing this value, while in Preserve Aspect Ratio mode, the Height value should adjust automatically.
As stated before, for a full page width, 1000 to perhaps 1200 pixels should be a good number. However, if it is a vertical image which you might want positioned to the left of your article paragraph text, 500 could be a better choice.
One important note, do NOT try to resize a small image to a larger one, because it will end up looking grainy and not good quality, giving a bad impression to your page.
Adjust coloring and more
If for some reason you would like to improve the coloring of the image, you can press shift+u to automatically improve the colors. If you don’t like the change, press ctrl+z to go back to previous. You can also press shift+g to manually make changes if you are not happy with the autocorrection.
Save for speed
Once you have cropped, resized and/or adjusted your image, press ctrl+s to save it. Make sure to save all images in jpg format (“Files of type” selection near the bottom of the dialogue box). These are the jpg settings I generally have set by default.
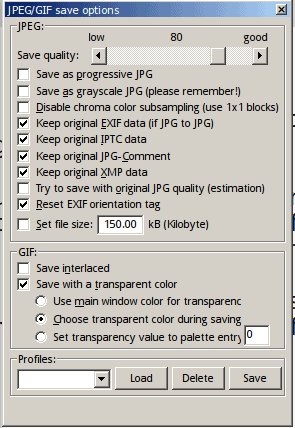
Whatever photo editing software you use, I find 80% quality is good for the web. At about 1,000-1,200 pixels wide for a full screen image saved at 80% quality, it is a reasonably small image in terms of the amount of its kilobytes, which helps the page load faster, which G likes.
When you save your image, or rename one you downloaded from the internet, it is VERY important to name it properly. The key words used in the name of your image should match the important keywords of your article, separated by a dash, no spaces. Such as important-keywords-article.jpg. Do not add unimportant words like “the” etc. but only use important keywords of the article. Never use the same name twice, but if you are talking about flowers, you might name the image important-keywords-article-flowers.jpg. This is very important for SEO purposes.
Inserting your image
Once you have your image or picture ready, have your cursor placed in your article as explained above and press the Add Media button near the top left of your page.
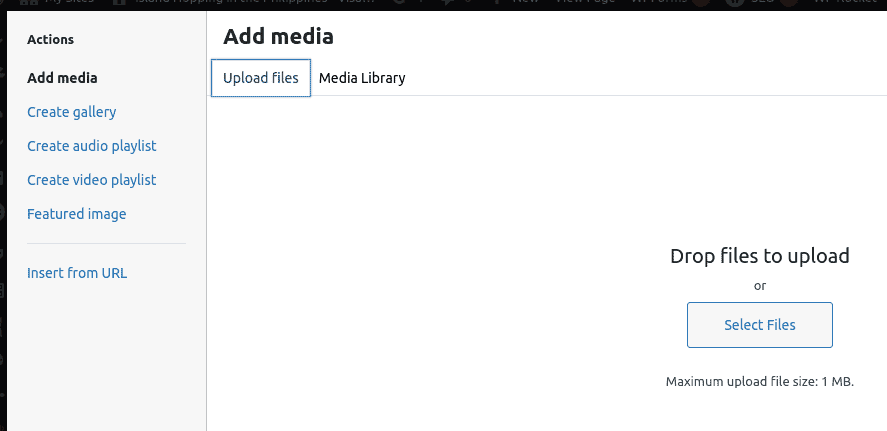
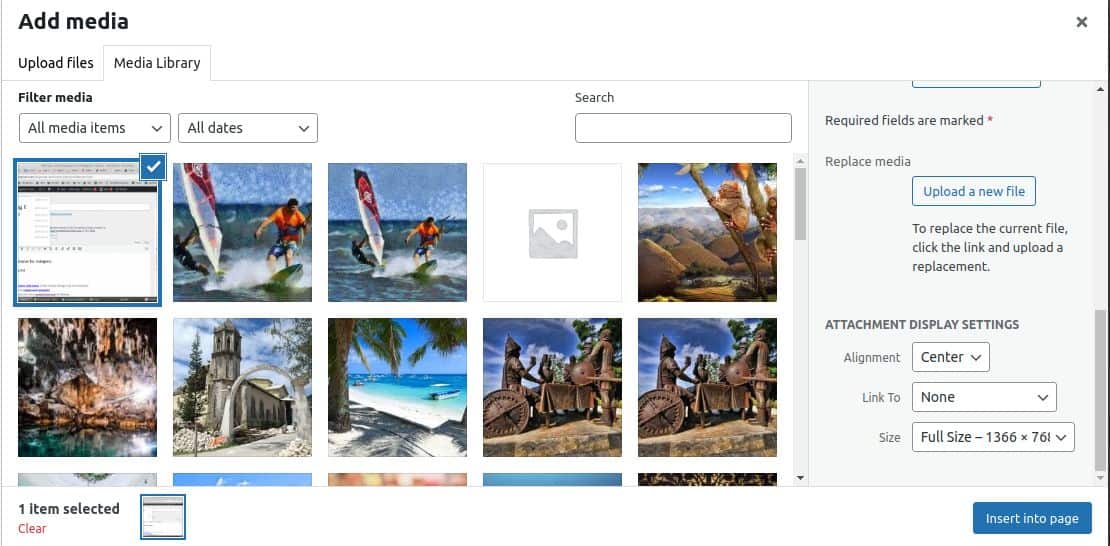
By default it is set to the Media Library tab near the top left, which is useful if you want to insert an image which we have already uploaded. But if not, don’t wait for those images to load but go ahead and press on the Upload Files tab, as shown in this screenshot above, and press the Select Files in the middle of the dialogue box.

This will move you back into the Media Library tab with your image selected as shown in this screenshot above. On the right you will notice the important fields “Alt Text”, “Title” and “Caption”. You want to copy the name of your file (important-keywords-article-flowers) and paste that BOTH into the Title and Alt Text fields. This is VERY important for SEO purposes.
If you want to write in a Caption, that is also possible, but often I find it is better to write a caption separately in the text of your article, such as centered and italic, just below the image. Refresh your output tab after Updating your article to see the final effects.
Next, scroll down the right side of your Add Media dialogue box as shown here:
I find Center alignment, None linked to (ie- if you click on the image in output view, it will take you to another webpage) and Full Size are the common settings. But if it is a vertical image at 500 pixels wide, that could be perfect to insert NEXT to text, either to the left or the right of the paragraph. The key is to make the article visually stimulating and captivating to read, so images are very important, as is their placement in the text, and to alt text/title them properly for SEO purposes. If you have any problems fine tuning your article’s display, I can help you with that once you are done.
As you insert images, go to your output tab to see the results, and work your way down your article (Publishing it every time), while reading it again, to get a good feel what image would be appropriate next and where to position it.
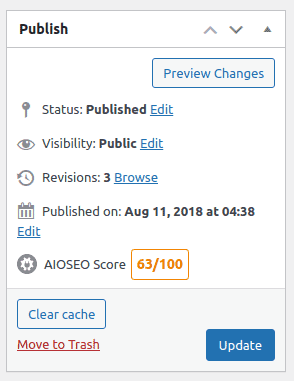
Once your are done with your article and satisfied, publish go to the bottom to the SEO section.
AIOSEO Settings
This should be the section just below the body of your article, screenshot here:
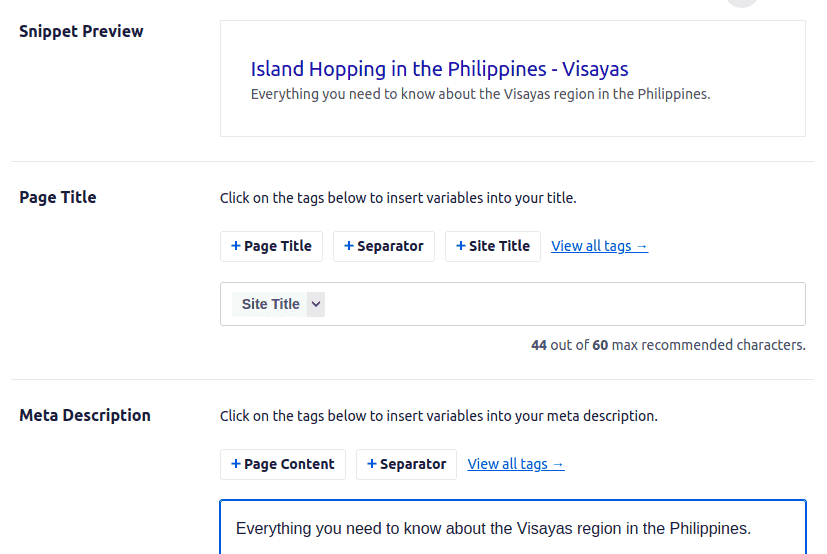
I have started using this plugin not long ago, and it just so happens that I have not updated my sample Visayas page yet, so we can together. The Page Title seems fine, as shown in the Snippet Preview (what it will look like in the google search results), but the Meta Description is set at the default Page Content. This section should be updated. You want something which will captivate the surfer to want to click on your link. How about this?
Next, we scroll down to the next section of Keyphrase. I admit I’m somewhat unclear about this but I chose the keywords “visayas region philippines” and got a score of 56/100, as shown here:
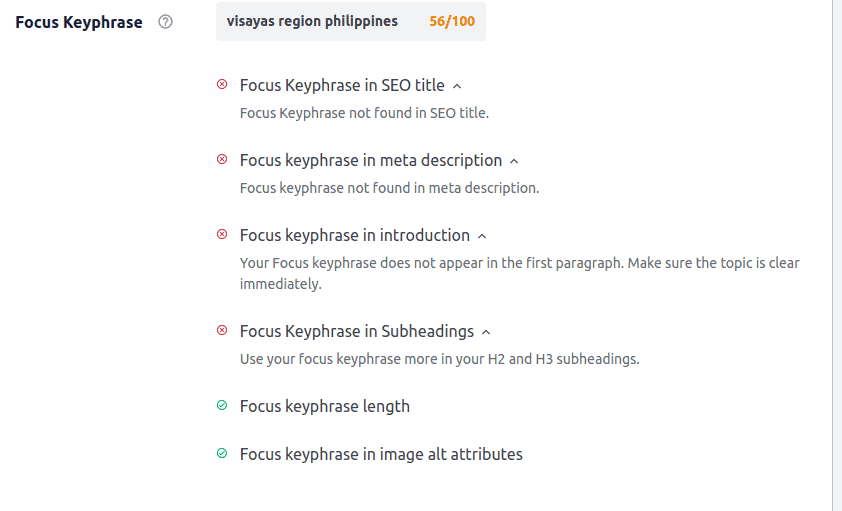
I am considering to upgrade to the pro version, but in the meantime, this seems important. Below this you will find various tips how to increase the score of your page. Using the important keywords in the headings, body of the text (so it is good to occasionally pepper your text with your important keywords, but don’t overdo it [referred in SEO terms as “keyword stuffing”], otherwise your page will be penalised by the big G), image file names and title/alt text are all little tricks to increase your score. I would not be too obsessed with the final score, which will be visible once you Update your page, as shown here at the top right of your screen:
Links out
Another very important aspect is links out of your article. Google doesn’t particularly like dead end pages. If while writing your article you think it could be appropriate and useful to link to further info, a few outbound links to other websites could be good for your page. Perhaps three outlinks maximum, but always to good quality websites. Generally, if you search for a subject, anything near the top of google should be considered by google a good quality website.
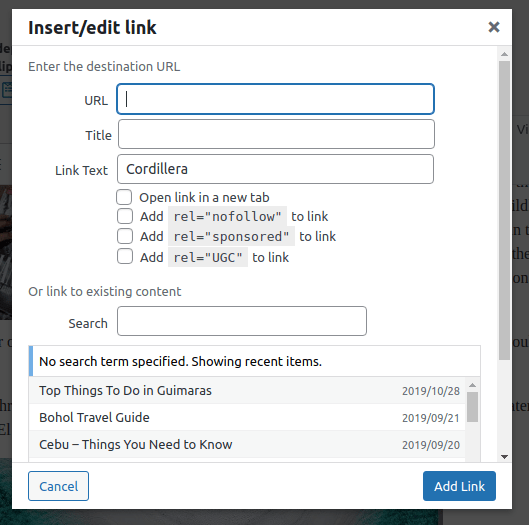
To link out from your text, it is better to go into your Visual tab. Select the text you want to link out from and press either ctrl+k or the link icon in your formatting strip, as shown here:
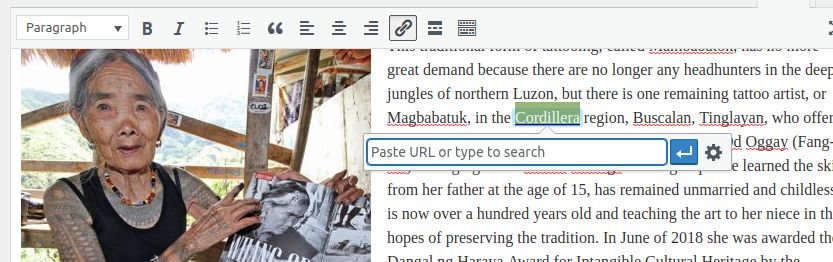
Paste in your outbound link, but then press on the Settings button to the right of your outbound link/url box, as shown here:
Hope you enjoyed learning this stuff and looking forward to long term, juicy cooperation!
Update letter for content writer
For our webpage on Siquijor.
did a search for “Siquijor” to see if i could find other content to add and occurred to me history. so you could do a search for “history of Siquijor” and see what you can dig up, adding a “history of Siquijor” heading section at the bottom. i would consider this the “boring” text i was talking about (but still try to write it in the most interesting manner – every bit of extra text helps in seo). but before that i think a “where to eat in Siquijor” heading section would be good to add, after the “places to stay in Siquijor” (always try to include the main keyword Siquijor in all the headings, if possible – very good for seo).
for the history section at the bottom, the following pages caught my attention:
what i do during this task is i quickly read and copy paste new and interesting information into my offline text file, then possibly ctrl+x (move) ctrl+v (paste) the different info around or to the top as i rewrite the concepts into my own words. once i have rewritten a sentence or paragraph etc into my own words, i erase it, and continue down the rest of the pastes from other websites until i have rewritten all the little bits of info into my own words and turned it into a nice, cohesive and entertaining article/section. once my first draft is done, i’ll read and proof it again, and once i paste that into wp, i’ll have the output in one tab while working in Text mode (because it is faster) to insert pics in the wp editing tab. i’ll Update it after every one inserted picture and F5 refresh the output page to read it quickly around where i inserted the picture. this helps develop a smooth flow.
i think it would be a good strategy to apply this to all the pages, to help it become the “go-to” website for travel to the filis (philippines): > what’s cool about it, > where to go/what to do, > how to get there, > where to stay, > where to eat, > history of (if you can find anything interesting about that), > and any other section you might stumble on.
actually, perhaps you could upgrade my previous pages if i have not done this yet. tons of work to do.
speaking of where to eat or stay etc, tripadvisor could be a good resource for this and you can use traveler reviews to each place for help with your description. i guess it would be a good idea to include this rating and a (nofollow) link to the establishment. just brainstorming. if travelers have all important information for each place in the country, they should have no reason to go to any other website. the trick is to keep them on our website, and always have our automatic ads on the right hand side for our boat tours (and any other services we might eventually add to it).
Second upate
I would only add the following.
– with all pages please check out tripadvisor for the best places to eat and add such a section. you can read through some comments for inspiration of what to write about the restaurant, although of course into your own words. maybe also you can look through trip for “things to do there” or other things to get some ideas. the more informative our site the better.
– i noticed you did not add any title or alt tags to the pictures. please do so for both your articles. this is extremely important for seo. what i do is i have a separate text file i use for copy pasting purposes. for this article i’d say the most important keywords in the title (you should always take such keywords from the title of your article and try to incorporate them into the headings, in a natural way, and all the pictures) are “sipalay negros”. so i would put the text sipalay-negros in my copypaste file. forgot to mention but it is important that this is also done to the NAME of the file you upload to the server. so rename it when saving it to your computer before you upload (file name should be same as alt text and title of pic). Now, I see you have a picture just under Danjugan Island. For this i would use the name sipalay-negros-Danjugan-Island, and then because i’m lazy i use the same for the title and alt tag (although it may be better to replace the dashes with spaces, up to you). Actually, about a third of our traffic comes from image searches, so this is very important for this reason as well, not only seo in general.
– it would be better to have a juicy, full width picture at the very top of each article. there is also some space of long text at the bottom, please throw in at least a picture there. people don’t like reading long text without pics. please also apply all this to your previous article.
– if there is a picture too small to fill the whole width, please center it rather than left alignment. if it has width of 500px or less, you can assign it left so that the text will go to the right of it and fill in the big space.
– as you can see from the url address of the article, you did not assign a category, in which case “uncategorized” ended in the link. please always choose an appropriate category, preferably as short a word as possible, because too long of a url link is not the best for g.
– and lastly, i don’t think you added any tag words (should show up at the bottom of the article, just under the category name. please choose the tags i have already been using as shown on the main visayas page. this turns it into an easily navigatable directory. for example, are there any waterfalls there? how about white beaches? caves? if you tag it properly, then when someone wants to find all the waterfalls in the visayas subsite, they just to click on that tag in the directory and they will be provided with all the pages that have that tag in it. hence it is important to always use the exact spelling. just refer to the main visayas page for the full list, and if you have any suggestions to add more, let me know first.
okay, everything looking great. i’ll go through the two articles thoroughly once they have been finalised and then i think you can just get into a comfortable routine following these procedures. if you like i can pay you for these two articles once you are done, or eventually get into of once a month routine.
Home » Various » jobs »You may also like:
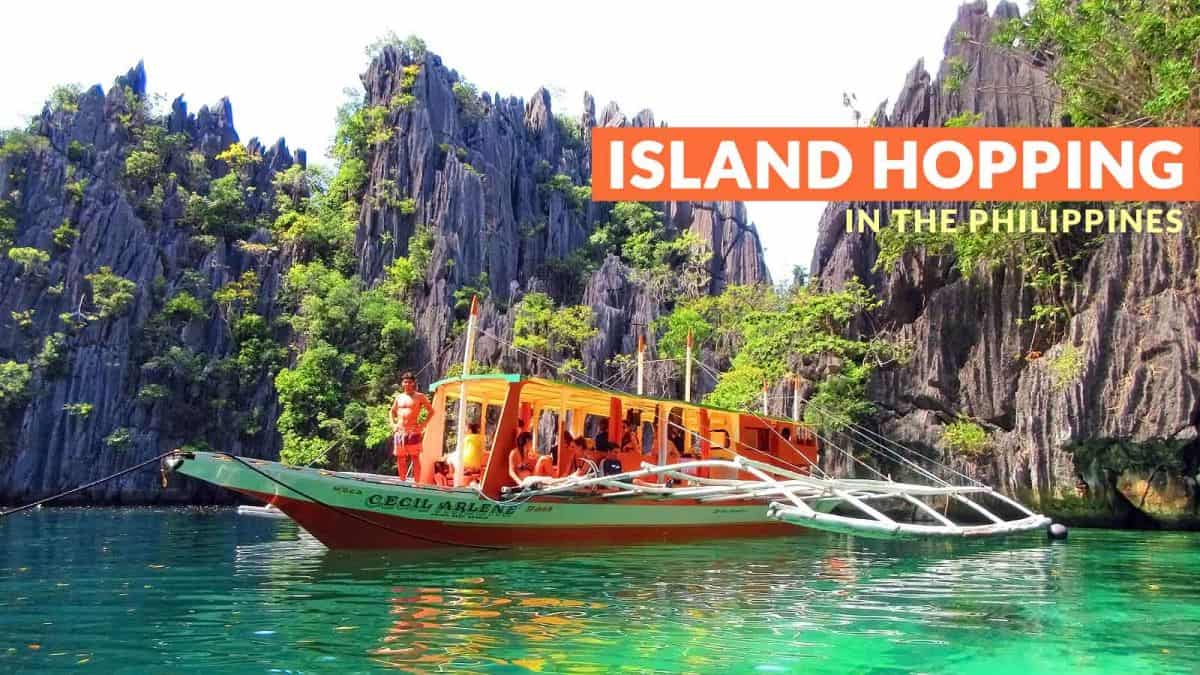
We are a family operation managing private custom boat tours in the beautiful Palawan area, and are happy to help travelers with their plans through the country, having traveled a lot of it ourselves and planning to visit it all.